10 Strengthening Exercises for Hip Bursitis


Key takeaways:
Bursitis occurs when small fluid-filled sacs near joints (bursae) become inflamed or irritated. Hip bursitis typically involves inflammation of the bursae at the sides of the hips.
Hip bursitis treatment includes strengthening exercises that activate the glutes and stabilize the hips. Ice, pain medications, and steroid injections may also ease pain on the outside of your hip and thigh.
Some stretches may further compress or irritate the hip bursae. So, talk to a healthcare professional before trying hip bursitis exercises.
Table of contents
Previously, researchers thought that hip bursitis was the primary cause of lateral or side hip pain. Now, experts know that greater trochanteric pain syndrome (GTPS) is a more accurate explanation. GTPS includes injury or wear and tear of the gluteal muscle tendons (tendinopathy), which may cause hip pain that worsens with movement.
When injured or irritated, the glute muscle tendons can also compress or irritate the underlying bursae in the hip. Bursae cushion tendons and bones to reduce friction during movement. When inflamed, bursitis results, causing a sharp or burning pain at the side of the hip.
Hip bursitis often resolves with targeted exercises and rest from aggravating activities. The best hip bursitis exercises should strengthen the glute muscles at the sides of the hips. This helps stabilize the legs with movement and supports the glute tendons to reduce friction on the underlying bursae. Strengthening exercises can also correct muscle imbalances to prevent hip bursitis from recurring.
SHINGRIX (Zoster Vaccine Recombinant, Adjuvanted) is now $0 for almost everyone*
Get SHINGRIX at the pharmacy or in-network doctor’s office today. 98% of privately insured people pay $0 and all Medicare Part D beneficiaries pay $0 at the pharmacy.
Prescribing Information
*Coverage and cost may vary and are subject to change without notice. Reimbursement decisions are made by individual insurance plans.

SHINGRIX is an FDA-approved vaccine for the prevention of shingles (herpes zoster) in adults 50 years and older. SHINGRIX is not used to prevent chickenpox.
• You should not receive SHINGRIX if you are allergic to any of its ingredients or had an allergic reaction to a previous dose of SHINGRIX
• An increased risk of Guillain-Barré syndrome (severe muscle weakness) was observed after vaccination with SHINGRIX
• Fainting can happen after getting injectable vaccines, including SHINGRIX. Precautions should be taken to avoid falling and injury due to fainting
• The most common side effects are pain, redness, and swelling at the injection site, muscle pain, tiredness, headache, shivering, fever, and upset stomach
• SHINGRIX was not studied in pregnant or nursing women. Tell your healthcare provider if you are pregnant, plan to become pregnant, or are breastfeeding
• Vaccination with SHINGRIX may not protect all individuals
• Ask your healthcare provider about the risks and benefits of SHINGRIX. Only a healthcare provider can decide if SHINGRIX is right for you
You are encouraged to report vaccine adverse events to the US Department of Health and Human Services. Visit www.vaers.hhs.gov to file a report, or call 1-800-822-7967.
For US audiences.
Trademarks are property of their respective owners.
©️2024 GSK or licensor.
PMUS-SGXWCNT240015 May 2024
Produced in the USA.
GoodRx Health information and resources are reviewed by our editorial staff with medical and healthcare policy and pricing experience. See our editorial policy for more detail. We also provide access to services offered by GoodRx and our partners when we think these services might be useful to our visitors. We may receive compensation when a user decides to leverage these services, but making them available does not influence the medical content our editorial staff provides.
Many experts also recommend stretching exercises to help treat GTPS or hip bursitis. But certain stretches may increase compression and irritation of injured gluteal tendons and bursae. This includes cross-body leg stretches and deep or end-range stretches that rotate the hip externally. That’s why it’s important to get clearance from your healthcare professional before starting a new exercise routine.
1. Glute bridge
A glute bridge is a bodyweight exercise that activates your glutes, lower back, and core muscles. Improved strength in these areas can help reduce strain at the sides of the hips.
Step 1: Lie on your back with your knees bent and your feet flat on the floor.
Step 2: Gently press your lower back toward the floor to engage your abs.
Step 3: Lift your hips without arching your back.
Step 4: Keep your core engaged by squeezing your glutes and drawing your belly button toward your spine.
Step 5: Hold this position for 5-10 seconds.
Step 6: Slowly lower your hips and return to the starting position
Step 7: Complete 15-20 repetitions.
Your hip isn’t the only joint in the body where bursitis can develop. Learn more about bursitis, including where it happens and what to do about it.
Many things can aggravate hip bursitis, including sitting for long periods of time. Find out what else can cause hip pain while sitting.
Most musculoskeletal problems can be blamed on how your body moves. It’s important to know about muscle imbalances so you can prevent injury.
2. Side-lying straight leg raises
Side-lying straight leg raises recruit outer gluteal muscles — like the gluteus medius — that help support the outside of the hip. Weakness in this area can lead to irritation and inflammation of the gluteal tendons and bursae.
Step 1: Lie on your side with your legs straight and your hips stacked.
Step 2: Keep your arm straight on the floor or bend your arm to support your head in your hand.
Step 3: Draw your belly button toward your spine to engage your core.
Step 4: Slowly raise your top leg, keeping it straight and your toes pointed forward. Don’t rotate your hips.
Step 5: Hold for a few seconds before you lower your leg to the starting position.
Step 6: Complete 15-20 repetitions on each side.
3. Clamshell
The clamshell exercise uses many glute muscles that help stabilize the hip joint. It may help prevent or treat lower-limb injuries.
Step 1: Lie on your side and bend your knees to a 45-degree angle. Keep your hips, knees, and ankles stacked on top of each other.
Step 2: Pull your belly button toward your spine to engage your core.
Step 3: Slowly lift your top knee, keeping your feet together. Don’t let your hips roll backward.
Step 4: Hold at the top for 5-10 seconds before slowly lowering your leg to the starting position.
Step 5: Complete 15-20 repetitions on each side.
4. Chair squat
The chair squat is a beginner-friendly weight-bearing exercise that uses several muscle groups in your hips and legs, including the glutes, quads, and hamstrings. Squats help keep your lower body aligned, which helps your hips stay stable with movement to lessen stress on your joints.
Step 1: Stand in front of a chair with your back straight and your feet hip-width apart.
Step 2: Squeeze your belly toward your spine to engage your core. Your back stays straight during the entire exercise.
Step 3: Bend your knees and shift your hips back as you lower down towards the chair. Keep your knees aligned with your ankles. Stop just before you reach the seat of the chair.
Step 4: Hold briefly before squeezing your glutes and extending your knees to return to standing.
Step 5: Complete 15-20 repetitions.
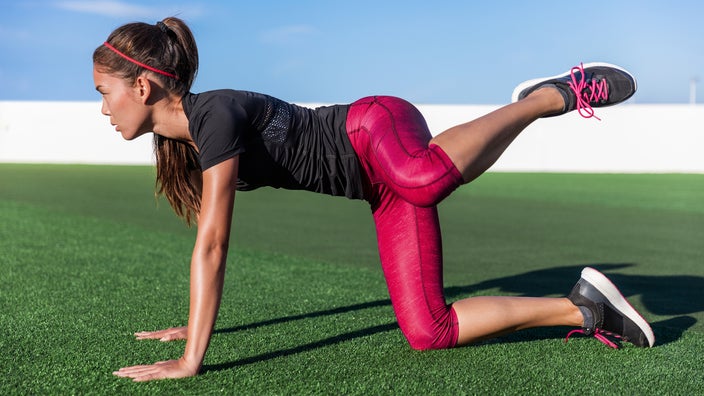
5. Fire hydrant
As you might guess, movement during the fire hydrant exercise looks like a dog lifting its leg. It offers a serious workout for your outer glutes.
Step 1: Start on all fours with your hands and knees hip-width apart. Make sure your hands align with your shoulders and your knees align with your hips.
Step 2: Engage your core and keep your neck and spine neutral.
Step 3: Shift your weight to the left and lift your right knee out to the side, keeping your right knee bent. Avoid rotating your spine to keep your hips level.
Step 4: Hold this position for a few seconds, then lower your leg to return to the starting position.
Step 5: Complete 15-20 repetitions on each side.
Read more like this
Explore these related articles, suggested for readers like you.


6. Side plank
Side planks challenge your core and hip stability. They work your glute muscles to lift and stabilize your pelvis.
Step 1: Lie on your side with your legs straight and stacked on top of each other. Your hips, knees, ankles, and feet should be aligned.
Step 2: Rest your forearm on the floor, aligning your elbow under your shoulder.
Step 3: Engage your core and lift your hips and knees off the floor. Your body should be in a straight line from your head to your feet with only your forearm and bottom foot touching the floor.
Step 4: Hold this position for 10-15 seconds. Then, slowly lower down to the starting position.
Step 5: Complete 3 reps on each side.
7. Isometric hip abduction
This exercise is an isometric move for your outer glutes. Isometric exercises activate muscles during a static hold without moving parts of your body. This can help build strength while decreasing strain with movement.
Step 1: Lie on your back and put a pillow under your knees.
Step 2: Secure a belt or resistance band tightly around your thighs, directly above your knees.
Step 3: Push your thighs out to the sides into the belt or band. You should feel the muscles on the sides of your hips activating.
Step 4: Hold for 10 seconds, then relax.
Step 5: Repeat 10 times.
8. Standing hip abduction
This exercise also focuses on the outer glutes. Improved strength in this area can lead to less irritation to the gluteal tendons and bursae. You can also add an ankle weight to make this exercise more challenging.
Step 1: Start in a standing position with your feet hip-width apart and toes pointing forward. You may want to hold onto a railing or counter for support.
Step 2: Keeping your knee extended, lift your leg out to the side. Don’t rotate your hip and keep your toes pointing forward.
Step 3: Hold your leg out to the side for a few seconds, then return to the starting position.
Step 4: Complete 15-20 repetitions on each side.
9. Wall squat with a ball
This move works multiple leg muscles together to improve your strength and hip stability. Focus on performing this exercise slowly with control for the best benefit.
Step 1: Start in a standing position facing away from a wall with your feet hip-width apart and toes pointing forward. Place a medium or large ball in between your back and the wall.
Step 2: Lean back into the ball, pressing it into the wall. Your feet should be positioned farther away from the wall than your knees and hips so that you’re leaning slightly backward.
Step 3: While pressing the ball into the wall, bend your knees to squat down. Allow the ball to assist the downward movement.
Step 4: Once you bend your knees to about a 45-degree angle, push through your legs to return to a standing position. Keep your back pressing the ball into the wall throughout the entire exercise.
Step 5: Complete 15-20 repetitions.
10. Prone hip extension
This hip extension exercise is another glute strengthener. Improved glute strength improves the overall stability of your hips.
Step 1: Lie face down on your stomach with your legs straight. You can rest your head on your arms or the floor.
Step 2: Squeeze the glute of one leg and slowly lift it up toward the ceiling. Keep your knee extended and your toes pointing down. Don’t rotate your hip or arch your back.
Step 3: Hold for a few seconds at the top before you lower your leg to the starting position.
Step 4: Complete 15-20 repetitions on each side.
How do you treat hip bursitis?
Conservative treatment helps relieve many cases of hip bursitis or GTPS. At first, it’s important to avoid irritating movements and positions that cause greater compression at the sides of the hip.
To help treat hip bursitis, you should cut down on the volume and intensity of physical activity until pain improves. You should also avoid movements such as:
Side lying on the affected hip
Leaning into the affected hip while standing
Crossing your legs
Sitting for long periods
Running or prolonged walking on uneven surfaces
End-range stretching of the piriformis, IT band, and hip abductors
Other treatments for hip bursitis and GTPS may include:
Physical therapy to manage your symptoms and improve your movement patterns through hands-on treatment and corrective exercises
Ice or cold therapy to decrease pain and swelling (if applicable)
A short course of over-the-counter (OTC) pain medication
If hip pain continues, your healthcare professional may consider giving you a corticosteroid injection in your hip. Corticosteroids are anti-inflammatory medications that can help ease pain and inflammation but only in the short term. It’s also important to consider that steroids have side effects and injections into tendons can weaken them over time.
Frequently asked questions
Various factors may cause hip bursitis or GTPS, including:
Repetitive strain: Overuse or repeated activity can strain the tendons. Prolonged walking on uneven surfaces, running, and standing for extended periods can trigger symptoms.
Injuries: Hip injuries can strain or tear gluteal tendons, causing bursitis or GTPS. Direct impact on the hips from falls can also irritate the glute muscles and underlying bursae.
Musculoskeletal conditions: Osteoarthritis, rheumatoid arthritis, scoliosis, and other conditions can cause the spine and hips to be misaligned. This can change your posture or how you walk, raising the likelihood of hip bursitis.
Rest, targeted exercises, and avoiding stress on your hips will help you recover the fastest from hip bursitis. Keep the following tips in mind as you heal:
Avoid prolonged running, walking, and standing when possible.
Be mindful to avoid placing your hip in irritating positions (like cross-legged positions and lying on the affected side).
Use targeted hip strengthening exercises to help support the gluteal tendons, which will reduce irritation to the underlying bursae.
Walking is a great exercise, but it can sometimes make hip bursitis worse. This is because the glute muscles work a lot to stabilize the hips with movements like walking and running. It’s best to limit prolonged walking at first when recovering from hip bursitis. You should especially avoid hills and uneven surfaces. Once your symptoms start to calm down, you can gradually increase the amount you walk.
The bottom line
Hip bursitis develops when the fluid-filled sacs under the tendons at your hips become inflamed. It’s part of a condition known as greater trochanteric pain syndrome (GTPS) that may cause lateral (or side) hip pain. Strengthening exercises for hip bursitis — especially those that target the glute muscles and hip stabilizers — can offer stability and limit irritation. This will help treat, manage, and prevent GTPS.

Why trust our experts?


References
American Council on Exercise. (n.d.). Side plank with straight leg.
American Council on Exercise. (n.d.). Stability ball wall squats.
American Council on Exercise. (n.d.). Standing hip abduction.
Gomez, L. P., et al. (2022). Greater trochanteric syndrome. StatPearls.
Grimaldi, A., et al. (2015). Gluteal tendinopathy: Integrating pathomechanics and clinical features in its management. Journal of Orthopaedic & Sports Physical Therapy.
Ladurner, A., et al. (2021). Treatment of gluteal tendinopathy: A systematic review and stage-adjusted treatment recommendation. Orthopaedic Journal of Sports Medicine.
Lustenberger, D. P., et al. (2011). Efficacy of treatment of trochanteric bursitis: A systematic review. Clinical Journal of Sport Medicine.
McCall, P. (2019). 7 new moves to challenge your glutes and hamstrings. American Council on Exercise.
MedlinePlus. (2022). Greater trochanteric pain syndrome.
Mellor, R., et al. (2016). Exercise and load modification versus corticosteroid injection versus ‘wait and see’ for persistent gluteus medius/minimus tendinopathy (the LEAP trial): A protocol for a randomised clinical trial. BMC Musculoskeletal Disorders.
PhysiHub Library. (2019). Hip extension (single leg, prone) [video]. YouTube.
Selkowitz, D. M., et al. (2013). Which exercises target the gluteal muscles while minimizing activation of the tensor fascia lata? Electromyographic assessment using fine-wire electrodes. Journal of Orthopaedic and Sports Physical Therapy.
Sheth, N. P., et al. (2022). Hip bursitis. American Academy of Orthopaedic Surgeons.
Walters, A., et al. (2017). Greater trochanteric pain syndrome clinical practice guideline. Ohio State University Wexner Medical Center.